Activity Overview
Subject: English Language Arts
Grade Level: 9-10
Time Allotment: 100 minutes (two 50-minute classes - this can vary)
Unit: "To Kill a Mockingbird" - Literary Analysis
I. Overview & Objectives
Big Idea: Storyboarding a novel's plot visually enhances understanding of narrative structure, key events, and the emotional arc of characters, fostering deeper analysis and visual communication skills.
21st Century Skills: Critical Thinking, Creativity, Collaboration, Communication, Digital Literacy, Visual Literacy.
Learning Objectives (SMART Goals): By the end of this lesson, students will be able to:
- Identify and sequence the key events of "To Kill a Mockingbird" on a plot diagram. (Knowledge, Sequencing)
- Create a multi-panel digital storyboard using Storyboard That that visually represents the exposition, rising action, climax, falling action, and resolution of the novel. (Creation, Visual Literacy)
- Select relevant textual evidence from "To Kill a Mockingbird" to accompany each storyboard panel, justifying their visual choices. (Analysis, Textual Evidence)
- Collaborate effectively with peers within Storyboard That's collaborative features to construct and present a shared plot storyboard. (Collaboration, Digital Literacy)
- Analyze how visual representation (characters, scenes, props, text bubbles) can highlight literary elements such as mood, character emotions, or setting as depicted in the novel. (Analysis, Visual Communication)
II. Procedure
A. Engage (20 minutes)
Hook: The Power of Visuals (10 minutes):
- Display a compelling short animated sequence (e.g., a clip from an adaptation of *A Christmas Carol*, or a short film without dialogue).
- Think-Pair-Share: "How does this visual story communicate without words? What key moments stand out? How do the images make you feel?"
- Introduce the concept of a storyboard as a crucial tool for visual storytelling, emphasizing its use in film, animation, and even complex novel analysis.
Connect to "To Kill a Mockingbird" & Plot Diagram Review (10 minutes):
- "We've explored the world of Maycomb in 'To Kill a Mockingbird.' Today, we're going to become visual storytellers, using Storyboard That to map out the novel's journey. By seeing the plot unfold visually, we can better understand how each event builds tension, develops characters, and reveals themes."
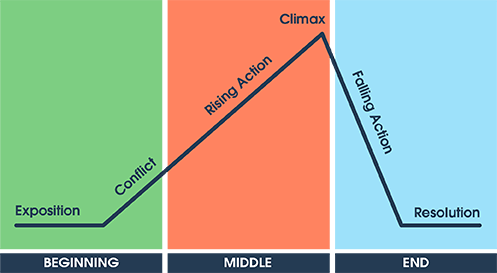
- Briefly review the elements of a plot diagram (Exposition, Rising Action, Climax, Falling Action, Resolution) using a simple graphic. Stress that the sequence is critical.
B. Explore (30 minutes)
Storyboard That for Plot Diagrams (15 minutes):
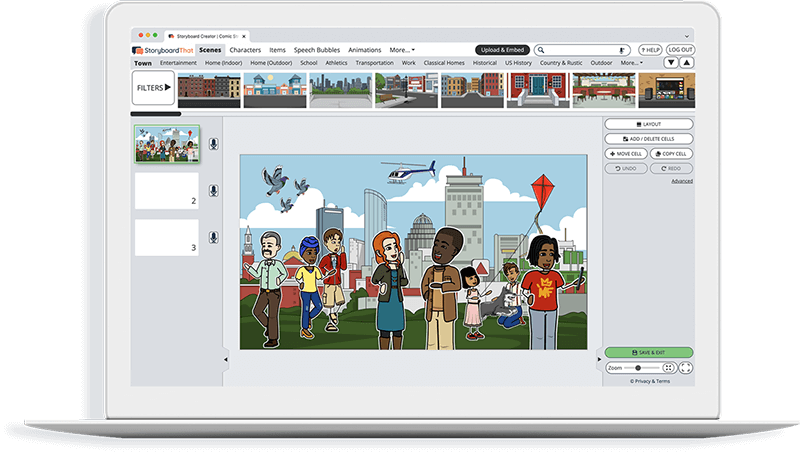
- Project the Storyboard That interface.
- Live Demonstration: Remind students how to:
- Navigate the scene library (e.g., "Town," "House," "Historical").
- Find and customize characters (e.g., "1930s," "Kids"). Show how to adjust poses, expressions, and colors to match character descriptions.
- Add props and textables (e.g., thought bubbles, speech bubbles for internal monologue or direct quotes).
- Add new cells.
- Utilize the "Layout" option for a plot diagram (e.g., a traditional diagram layout or a linear progression with text boxes below for explanation). Highlight that Storyboard That often has pre-made "Plot Diagram" templates within its assignment section.
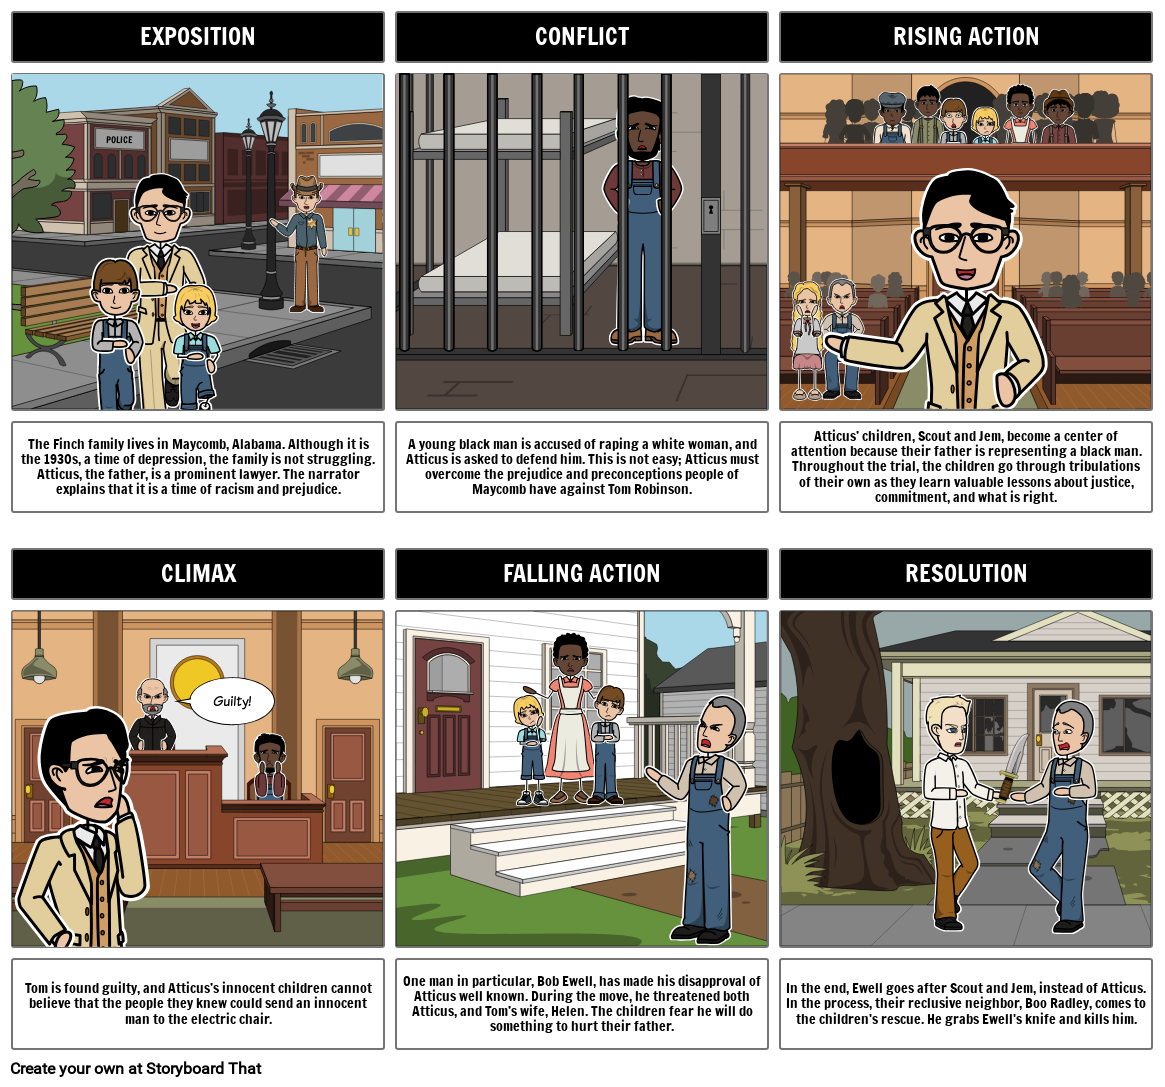
- Display and go over the Storyboard That created example
- Discuss how visual choices (character expressions, scene details, color palette) convey mood and and character.
- Walk students through how to begin and give a title to their storyboard.
Template and Class Instructions
(These instructions are completely customizable. After clicking "Copy Activity", update the instructions on the Edit Tab of the assignment.)
Task: Mapping the Story's Plot with Storyboard That!
Harper Lee's "To Kill a Mockingbird" is a powerful story, and understanding how she tells it is key to unlocking its deeper meanings. You will become a visual storyteller, using Storyboard That to illustrate the novel's journey through its essential plot points.
Your Goal: To create a clear, compelling, and insightful visual plot diagram of "To Kill a Mockingbird."
Instructions:
-
Understand the Plot Diagram:
- Exposition: The beginning! Introduce characters and the initial setup.
- Conflict: The main problem or struggle that drives the story.
- Rising Action: The events that build tension and lead to the climax. Think about the key moments that escalate the conflict and develop characters.
- Climax: The turning point! This is the most intense moment of the story, where the conflict reaches its peak.
- Falling Action: The events that happen after the climax, as the tension starts to decrease and loose ends begin to tie up.
- Resolution: The ending! How is the main conflict resolved, and what is the final outcome for the characters?
-
Create Your Storyboard using the template provided. Be sure that each cell includes:
- Visual Representation: Use Storyboard That's extensive library of scenes, characters, speech bubbles, and props to create a clear and impactful visual. Think about details that capture the mood, setting, and characters' emotions in that specific moment. Aim for creativity and accuracy!
- Concise Caption: Write a 1-2 sentence description below your image. This should clearly explain the key event or idea you're illustrating.
-
Review and Refine: Before submitting, review your entire storyboard.
- Are the visuals clear and engaging?
- Are the captions accurate and concise?
- Is the textual evidence relevant and correctly placed?
- Does your storyboard accurately represent the plot progression of the story?
Remember: Your storyboard isn't just about showing what happens, but how it happens and why it's important to the overall story!
Lesson Plan Reference
Rubric
(You can also create your own on Quick Rubric.)
| Proficient 25 Points | Emerging 21 Points | Beginning 17 Points | Try Again 13 Points | |
|---|---|---|---|---|
| Descriptive and Visual Elements | Cells have many descriptive elements, and provide the reader with a vivid representation. | Cells have many descriptive elements, but flow of cells may have been hard to understand. | Cells have few descriptive elements, or have visuals that make the work confusing. | Cells have few or no descriptive elements. |
| Grammar/Spelling | Textables have three or fewer spelling/grammar errors. | Textables have four or fewer spelling/grammar errors. | Textables have five or fewer spelling/grammar errors. | Textables have six or more spelling/grammar errors. |
| Evidence of Effort | Work is well written and carefully thought out. Student has done both peer and teacher editing. | Work is well written and carefully thought out. Student has either teacher or peer editing, but not both. | Student has done neither peer, nor teacher editing. | Work shows no evidence of any effort. |
| Plot | All parts of the plot are included in the diagram. | All parts of the plot are included in the diagram, but one or more is confusing. | Parts of the plot are missing from the diagram, and/or some aspects of the diagram make the plot difficult to follow. | Almost all of the parts of the plot are missing from the diagram, and/or some aspects of the diagram make the plot very difficult to follow. |
How To Make a Cohesive Plot Diagram
Understand the Elements of the Plot Diagram
Teachers can begin by explaining the main elements involved in the plot diagram and provide students with easy definitions. They can also provide examples from other novels and stories of the exact part of the story that resonates with a specific plot element.
Highlight Important Parts
After understanding the main elements of the plot students can review the book once again and highlight the parts they think are the most important and fit in the definition of the plot elements.
Make a diagram
Start by sketching a straightforward line to depict the plot. A section of this line will represent each plot element. Depending on the student’s preference, either a straight line or a curve may be used.
Divide the Line
Separate the line into parts that represent the various plot components. Exposition, Inciting Incident, Rising Action, Climax, Falling Action, and Resolution should be in that order from left to right.
Summarize Events
Describe the main event that takes place during each portion of the story in only a few sentences. These incidents ought to summarise the key plot points and aid in illuminating the development of the narrative.
Frequently Asked Questions About Creating a Plot Diagram for “To Kill a Mockingbird”
What occurrence should I pick as the provoking event?
Atticus agreeing to defend Tom Robinson in "To Kill a Mockingbird" serves as the book's catalyst. The main conflict of the novel is launched by this occurrence.
How can I adequately capture the escalating action?
The confrontation intensifies and tension rises as a result of a number of incidents in the escalating action. Include moments from Boo Radley's gifts discovery, Scout's first day of school, and Atticus's defense of Tom Robinson, among others.
What crucial development should the climax focus on?
Tom Robinson's trial serves as the novel "To Kill a Mockingbird"'s conclusion. As Atticus offers his defense and the jury announces its decision, it's a crucial moment when the tension reaches its climax.
How should I depict the falling action and resolution?
The actions that occur after the climax and depict the fallout make up the falling action. You can portray Scout and Jem's evolving friendship with Boo Radley as well as the teachings they come to understand. The conclusion of the trial and the chat between Atticus and Scout may serve as the resolution.
More Storyboard That Activities
To Kill a Mockingbird
Testimonials

“By using the product, they were so excited and they learned so much...”–K-5 Librarian and Instructinal Technology Teacher

“I'm doing a Napoleon timeline and I'm having [students] determine whether or not Napoleon was a good guy or a bad guy or somewhere in between.”–History and Special Ed Teacher

“Students get to be creative with Storyboard That and there's so many visuals for them to pick from... It makes it really accessible for all students in the class.”–Third Grade Teacher
© 2025 - Clever Prototypes, LLC - All rights reserved.
StoryboardThat is a trademark of Clever Prototypes, LLC, and Registered in U.S. Patent and Trademark Office


